PIVOTING TO DIGITAL EVENTS: Webcasting Setup Update - small measures for large gains.

As our industry continues to evolve and tackle increasingly intricate webcast events, we are always fine-tuning our engineering setups and workflows. Some approaches look fantastic on paper until you're in the middle of a show saying, "If only I could..."! While we are overall thrilled with our remote capabilities, there is always room to improve. 

Onsite with Vegas City Opera. TD Go Juice provided by client.

Onsite with Vegas City Opera. TD Go Juice provided by client.

The latest iteration of the StudioKurcan Remote Studio Deployment Kit (SK-RSDK Mk. IV) addresses critical performance, logistical, and creature comfort issues from the Mk. III build. These updates have improved overall system performances and will allow a production crew to manage departments easily, and are as follows: 

SK-RSDK Mk. IV

SK-RSDK Mk. IV

Internet: 

The SK-RSDK Mk. IV depends on a strong & stable onsite wired internet connection for transmission. We have found, however, that location wireless options are often lacking to handle remote control operations. A Gigabit Switch routes signal to both the OWC Thunderbolt 3 Hub and a Linksys EA6400 wireless router. This router manages control signals coming from iPads running Touch Portal and TouchOSC. A bonded-cellular backup system would best serve a future iteration of the kit but does have a high entry cost. 

Audio: 

TouchOSC has been a welcomed addition to the setup. This program controls Audio signals routed to Reaper DAW from the UMC-1820, allowing for fast control of individual channel levels and muting. VST effects can be applied to any track, subgroup, or master via Reaper. And the control layout is fully customizable based on production needs. TouchOSC makes it easy to hand audio control to a proper A1, reducing missed cues/peaking/operational strain on the Technical Director.

TouchOSC on a very messy desk.

TouchOSC on a very messy desk.

Data: 

As more devices join the system, the voltage and data demands increase as well. Signal drops started occurring on occasion when adding hard drives, additional monitors, and longer show runs. A discretely powered USB 3.0 hub ran directly to the host computer now handles all audio device and peripheral connectivity. The OWC Thunderbolt 3 hub handles video input, internet, and one local monitor. Additional monitors are connected to the host computer directly via display adapters. Any power-only USB devices such as lamps, mobile devices, etc are ran from a dedicated power conditioner.

This updated schema has dramatically improved performance and mitigates dropped video frames from the J5 Create input cards. Heat is also an emerging problem as we attempt to consolidate and rackmount gear. Cooling fans are in production to assist, and a custom fan mod to the OWC Thunderbolt 3 dock in the works (currently a small laptop cooling pad - a 3 cm fan and vents will be installed soon). Eventually, a move to the OWC Thunderbolt 3 Pro Dock may be warranted - but for now, the spirit of DIY hacking works well. 

Crewing: 

As our activations' scope and frequency are increasing, we find it essential to enlist a more extensive production crew! An onsite Producer has been invaluable in our success. Clients can see a difference in the setup day's smoothness and value in having an informed representative available to field questions and wrangle talent. At the same time, the Technical Director is free to triple check all connections and assets. It's also important to note the often overlooked functions of the Producer:

  • Verifying all schedule and run-of-show information.

  • Writing show flows.

  • Blocking talent (meaning directing them to their proper on-camera location, and so much more!

Everyone wins at an adequately staffed production! Additional positions will join as needed - keep an eye out for an upcoming SK Best Practices dedicated to defining a production crew's roles and advantages. 

We'd love to hear about the setups you are using, and of course, see your work! StudioKurcan is always here to help - offering full-service media production, webcast & virtual event production, and consultation services. 

PIVOTING TO DIGITAL EVENTS: Webcasting Setup for Virtual Events

In our first article on Pivoting to Digital Events, we focused on adding professional broadcast graphic elements to your live program for enhanced viewer engagement. In this installment, we will address how to get your content streaming live to the world, with differing levels of complexity and entry costs. No matter the format of your show - webinar, webcast, live event/concert, virtual event, or pre-recorded playback - a tested, stable, and repeatable technical setup is crucial to successfully delivering content to your viewers.

Read More

SK Best Practices - Video Pre-Production Basics

clapper-board-1019607_1920.jpg

Video Pre-Production

Steps to success.

You have a fantastic idea. Don't blush - you know it's true. It's such a good idea that you need to create a video for maximum audience engagement and promotional value! 

So... now what?

Now you start the task of planning your video: Pre-Production. This vital process will help organize your thoughts, needs, and vision. The documents you create will guide you and your creative team throughout the life of the production. In the end, it will save you time - which will save you money. 

I. Audience Personas & The Creative Brief

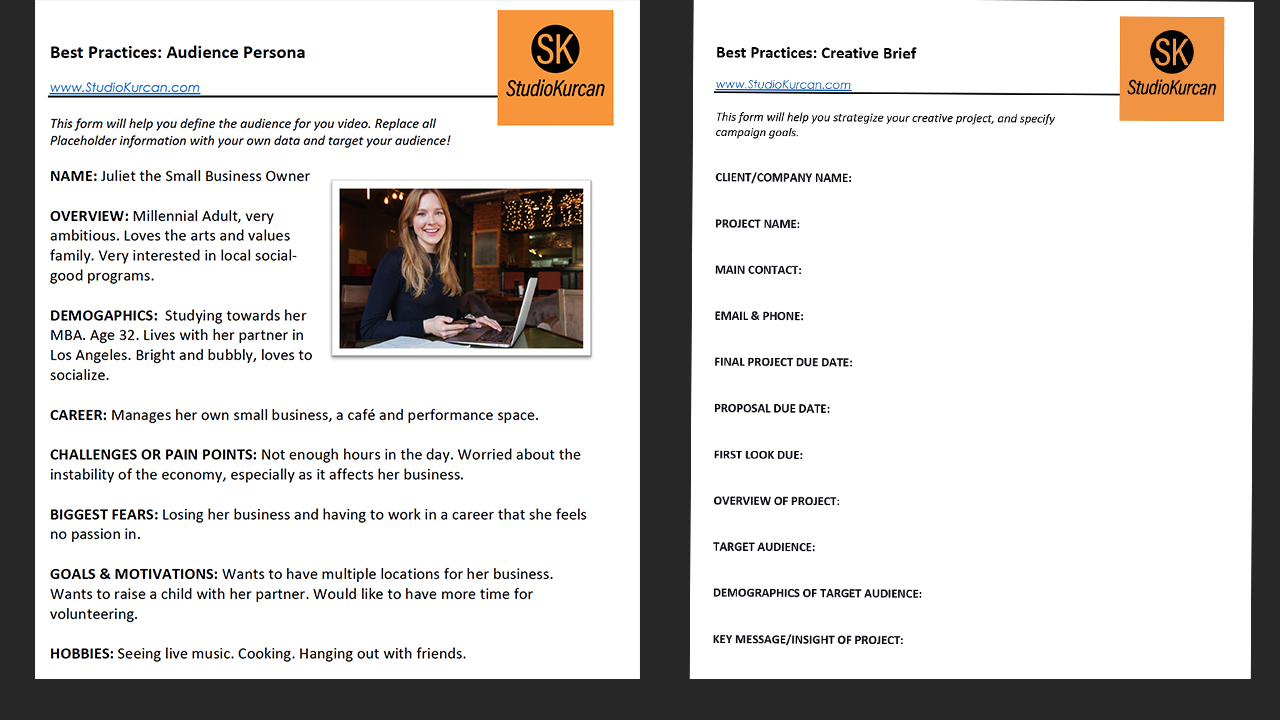
While what you want to say is important, who you are speaking to is everything. A well thought out audience persona and creative brief will help you define your audience, and what exactly your message needs to be. You may find that you need to create multiple audience personas based on your audience demographics. Developing these personas will help you better target your content. 

Just like any story, you need to describe who, what, when, where, and why. The creative brief answers those questions - and more! During this process, you will identify what objectives the video will accomplish, general timelines, and the specific intended audience. This document will be your roadmap that guides everyone on the project.

Audience Persona & Creative Brief Templates.

Audience Persona & Creative Brief Templates.

The creative brief will also help your creative production team generate a proposed budget, synopsis, treatment, and script. Once you have completed audience personas and the creative brief, story development can begin. Eventually, these developmental documents will turn into your script. Depending on what kind of video you're producing, you may only need one of these devices or can combine them. 

II. Synopsis & Treatment

synopsis is a brief overview of the story, generally no more than three to four paragraphs long. There is no set format for a synopsis - it can be a table or chart, prose, or any other form that works best for you. Keep your writing in the active voice, and focus on the narrative arc of the video.

At this stage, avoid substantial detail and leave out scene headings/slug lines (INT. OFFICE, etc.). Focus on the subject, problem, and soliton. The synopsis will often serve as the client pitch. 

After the synopsis, the treatment will further outline the story and specify the accompanying visuals. A simple A/V two-column style may suffice for some projects, but a treatment storyboard hybrid allows stakeholders to visualize the final project in more concrete terms. 

A/V Script Template.

A/V Script Template.

The storyboard will become more intricate as you move into the scripting phase of pre-production. 

III. Script & Storyboard

Write your script. Revise it. Revise it again. And again. Make sure you are saying exactly what needs to be said. 

Read the script aloud and watch for any tongue twisters. Make sure that your script fits into the expected length of your video. If it takes a minute to read your script, assume that the video will run a bit longer than that - accounting for cutaways, animations, and pacing. 

Insert action points throughout the script. Describe the type of shot envisioned, what sounds accompany the action, and what the viewer is seeing. Call out any segments that require animation or overlay graphics. Keep track of time in the script for each scene. A two-column AV script will organize this neatly. Lock the script as soon as you can agree on having no more changes. 

Once locked, fold the script into a full storyboard to plan out every shot and piece of media that will appear in the video. Don't worry if you are not a fantastic artist; the goal here is to visualize every part of the video from start to finish. 

If needed, pull stock images that match intended poses or actions. Place branding elements on top of these images, where applicable. I use a PowerPoint deck designed for speed and editability. Worst case, write out a bulleted list of what needs to happen in the shot. 

  • Medium Close Up of Talent.

  • Talent turns to face camera. 

  • They are holding the product. 

Storyboard Template.

Storyboard Template.

Your production team will build a script breakdown and shot list from the storyboard, helping to maximize onsite shooting time. The script breakdown will identify every item needed for the video: locations, props, effects, voiceovers, music, talent – literally everything that needs to be sourced or made for the final product. The shot list will provide a shot-by-shot breakdown of each scene, delineating framing, and other details such as lensing, location, camera movements, and time of day. 

Shot List Template.

Shot List Template.

IV. Next Steps

With a solid set of pre-production materials completed, it's time to plan the shoot. Your production team should start scouting locations, physically going to each location, and observing lighting conditions, any possible sound issues, amongst other things. 

Take copious notes during a site visit. Are there sounds from HVAC, or road noise? Are there windows that will need covering before shooting? How far will gear need to be pushed to get to the location? 

Photos and videos should be taken of every location for reference. A director's viewfinder (or viewfinder app) can be useful to preview what shots will look like on the actual production camera. The location scout is also the perfect time to think about onsite logistics, insurance, and permits that may be needed. 

Now that you've prepared a bulletproof plan for your video, you and your team can start sourcing talent, crew, props, and any gear that is required. Do not stress if you feel that you've missed a step. There's always time to course-correct, and you'll be able to attack pre-production better for the next project. 

Be sure to take a look at the pre-production template documents here, and stay tuned for our next installment of SK Backstage!